Perfect local server with Atom
I've been using all kind of local server solutions back in a day, from WampServer to Vagrant. I noticed that I had to spend large amount of time on learning and configuration. That was, not only time consuming, but also very frustrating, especially when you're a newby and you don't understand half of the instructions and problems.
Even now, that I'm experienced developer, I don't need complicated solutions for more than half of my tasks, so I decided to find simpler solution for development inside my Atom.
Bitnami WAMP stack
First things first—you'll need an actual local server. I've tried more than few solutions and finally decided to go with Bitnami WAMP Stack for Windows. Installation is pretty straightforward, but let's go through step by step.
First go to Bitnami WAMP Stack page and download installer and start the installation process.
During installation setup, select if you want to install any PHP framework. I didn't, because I don't actually need any.
Then select where you want to install Bitnami WAMP Stack. After that Setup will create root user for database. Enter password and remember it, maybe you'll need it in the future for some more complicated development.
Next steps are to select Apache web server port, SSL port and MySQL Server port. Port 80 is the standard Apache web server port, but it may not be available on you machine. In that case, select another port or make sure port 80 is not in use. Port 443 is the standard SSL port, try to set it up. If in use, use another one. Do the same with MySQL Server port, the standard port is 3306. Remember this settings, maybe you'll need it some day.
If any port is available, Setup will automatically assign standard port and skip steps.
That's it, proceed with a installation, wait for process to finish and violà—you got yourself a local web server.
php-server for Atom
If you managed to install Bitnami WAMP Stack, you could use it as your development environment. You could even install WordPress or any other module for Bitnami WAMP Stack for even quicker and simpler development environment. With a little knowledge of hosting, you could event add a local domains. I'll write about this topic in the future, so stay tuned.
But often I find myself in a situation where I don't need the whole environment, I just need to develop and test a single feature. This is where php-server for Atom comes in.
php-server allows you to run PHP server from any folder or file. You don't have to be a PHP developer to use it, because this package allows you to see static HTML pages, too. And this is where php-server has saved me a great amount of time.
Imagine you need to create a form or a jQuery plugin. It is part of some complicated project written in C# or Ruby. There is no need run the project for this job, all you need is a page, a static demo page where you could fake real project page and quickly complete a task. Easy! Create new folder, create index.html or index.php file, add some markup and styling or a script and start developing.
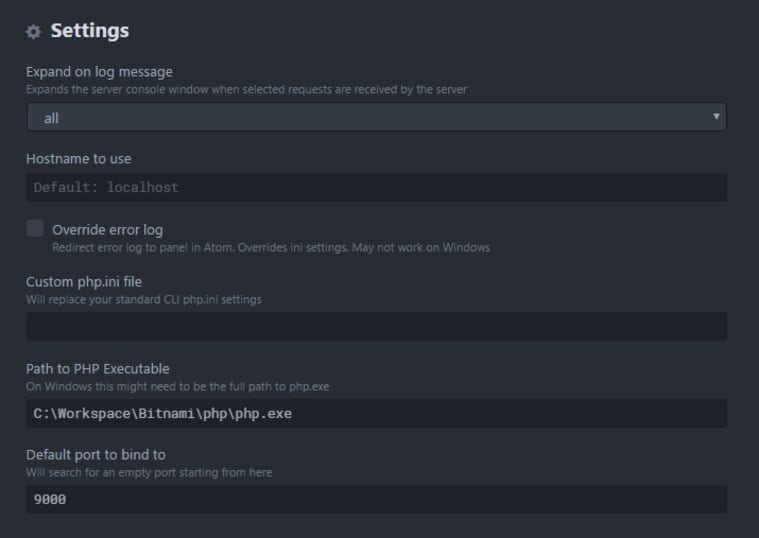
php-server is available on Atom package manager. After installation, you'll have to configure package. The most important settings are Path to PHP executable and Default port to bind to. This is why we had to install Bitnami WAMP Stack (or any other local server). In the installation folder of Bitnami WAMP Stack, find php folder. You should find executable PHP file there, php.exe. This is your path. Default port cannot be the same as Bitnami's, so use another one, like 9000. There are other advanced options, but they are out of scope of this article.
There are no shortcuts for this package, you'll have to call commands from command palette. The most common commands are Php server: Start and Php server: stop. For all available commands, please refer to php-server package page.
When you start php-server, your browser will start automatically and try to open index.php or index.html file. If necessary, you could use different filename, but then you have to add that file to the URL. For example, if you create file with named form.php, then your URL should look like this: http://localhost:9000/form.php.
When you run your php-server for the first time, Firewall window could pop out asking you to allow access to this feature. You should allow it. This depends of your system settings.
That's it! If you're more familiar with PHP, you could even create more advanced architecture for your development.
By default, PHP opcache is turned on. This means that you'll have to wait for new changes in PHP file to propagate every time. To turn off this feature, go to php folder in your Bitnami installation folder and open file named php.ini. Search for opcache.enable and set it to 0. Now every change in PHP file should be immediately propagated to your browser.
livereload
So far we managed to set up our local PHP server. Now let's get fancy.
Back in the day every developer dreamed about live reloading in browser on file change in editor. Today there are more than few solutions for that. Since we're using Atom, let's make it work in Atom.
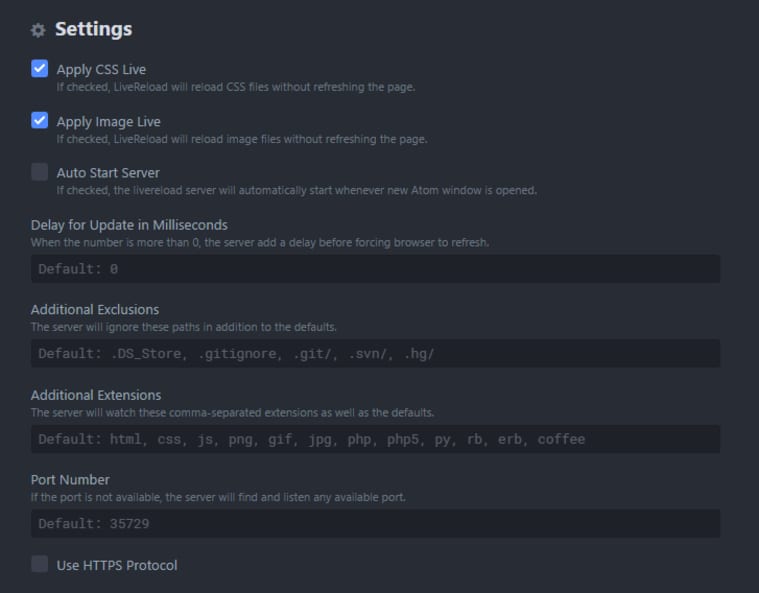
Go ahead and install livereload package from Atom package manager. After installation, you should configure package. There nothing much here, this is how my configuration looks like:
To start livereload server, you could use command palette or shortcut ctrl + shift + R.
Nothing happens in your browser yet, because we need to install browser extension as well. Go to the LiveReload extension's website and install it. It works both on Chrome and Firefox.
I prefer Atom solution for LiveReload because native solution didn't work well on my machine. Plus, I could use it directly from Atom and that is pretty awesome, if you ask me.
Assuming that you've started livereload server in Atom, now you could turn on your browser extension. Go ahead and save changes in CSS or JavaScript or PHP file and enjoy the magic.
If you're using Gulp or Grunt or any other task runner, don't worry, it will work. More about that in the following articles.
Final thought
There you have it—a perfect local server. It may not be adequate for complicated architectures, but it's perfect for quick and simple development. All you need to do is turn on your Atom, start php-server and livereload and start digging in. Isn't that just prefect?