We should automate our development process whenever possible. But there are so many tools available and new ones are published every week. Even though these tools help us, it could be very time consuming to learn and to handle all of these tools.
In this post I'll show you how to automate development process using only Atom packages.
Manual tasks
Let's say we're starting a new project. It's an open source project, a JavaScript plugin, which anyone could contribute. Developers who wants to contribute need source code, beautiful and easy to read. Developers who just want to use the plugin need minified and compressed files.
Beautiful source code
Beautiful source code is a must. Nobody wants to work on a code that is not properly aligned or formatted. But not every developer could produce beautiful code. Most of the times this is not intentional, because when we are in a process of development, we're not focused on beautiful code, we're focused on functional code.
To make our source code beautiful, we could go manually through every line and apply proper formatting and alignment. We are not gonna do this, though, because there are online tools which could help us, like Online JavaScript beautifier.
But that doesn't feel right, too. Who has the time to copy-paste code back and forth.
editorconfig
We should use editorconfig, a set of rules which define how our code should be formatted. These rules should be written in .editorconfig file which should be placed in a root folder of our project. editorconfig provides plugins for almost every popular text editor. That's awesome, because our plugin will be beautiful no matter who works on it. Yaay!
editorconfig rules are out of scope of this article. For full documentation, refer to editorconfig official page.
What about CSS files?
Sure, we should use editorconfig here, too. But what if we want to sort CSS properties, for example? Or add missing semicolons? Easy, we could use csscomb.
CSScomb
csscombis a tool which formats CSS files based on configuration file .csscomb. There was an online tool, but just like Online JavaScript beautifer, there is unnecessary cope-paste back and forth again.
To create our config file, we could refer to all available options or to online config builder. We should put our config file in a root folder of a project.
This won't work unless we install Atom package for csscomb. There are several packages available, but my favorite is atom-css-comb.
Now our CSS files are beautiful, too.
pretty-json
We should publish our plugin on package manager, like bower or npm. That means we should create and configure JSON files: bower.json and package.json. JSON files should be pretty, too. That's where pretty-json package steps in.
This very popular plugin formats JSON files on command. As a bonus, this plugin could warn us if our JSON files are not properly formatted.
Minification and uglification
Our source code is beautiful, now's the time to compress our files. Compressed files are usually used in production. Final user doesn't need beautiful file, user doesn't even care about the file, user just want a super fast and fluid experience. Every byte matters, because smaller files equals faster load.
CSS files are minified and JS files are uglified. We don't want to use online tools, like JavaScript Compression Tool or CSS Minifier. We don't want to use Atom packages either. The main reason is because we want to make a separate file that is compressed and that couldn't be achieved easily inside Atom.
What we want is a tool which creates compressed versions of our source code files in a separate files automatically. And for that task we should use tools like Gulp. Gulp is a task runner based on Node.js. Gulp community created and shared quite a large number of plugins. For our tasks to compress our files, let's use gulp-cssmin and gulp-uglify.
Gulp tasks are out of scope of this article, please refer to official Gulp documentation.
After we installed Gulp and defined Gulp tasks, we should run it from console by typing "gulp" and the name of our task. For example, gulp cssmin. When Gulp finishes with a task, our CSS file should be compressed. The same is with JS files, run gulp uglify inside console.
Although this is very easy, it is also a little bit clumsy, switching from Atom to console all the time. Fortunately, we could run these tasks from Atom using gulp-manager.
gulp-manager
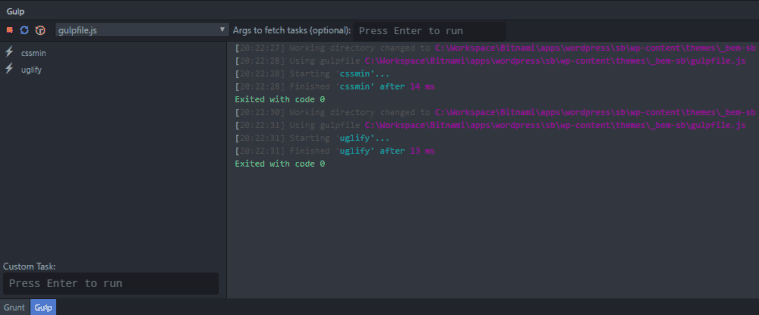
gulp-manager is a package that could run Gulp tasks from Atom. This package doesn't work without bottom-dock, therefore we should install this package, too. After installation, we should run it through default keybinding for gulp-manager: alt-shift-D.
We should see a new dock with 3 main sections:
- task list,
- input field and
- console output.
If we want to run a task, we could click it from task list. On the right side we could see a console output for these task. It is very useful when debugging invalid or failed task. Alternatively, we could write the name of the task inside input field and then press Enter.

Our files are now compressed and tasks are run from Atom. We don't need a console anymore.
Conclusion
Most of this tools are available as a standalone solutions. But why use them separately, when we could run them from inside Atom editor.
Once when you get comfortable with this kind of automation, you won't think of manual tasks again.
Which Atom packages are you using to automate your development process? Do you like ones mentioned in this article?
Don't be a stranger, leave a comment or send me a tweet.